You know that your traffic has gone up. Way up. But you’re still not hitting your lead generation goals. This is not the result you had expected to see from your blogging efforts. So what gives?
The answer to this question usually lies in two places: A step in your conversion funnel is broken, or your targeting is off. In this article I’m going to assume you’ve already fine tuned your targeting, and are now closely analyzing the steps in your conversion funnel with the hope of finding a leak.
Let’s assume that your funnel looks like this: Search Result -> Blog Post -> Landing Page -> Form Submit -> Thank You Page.
In analyzing this funnel, you realize that the largest drop-off in your funnel is the step between your blog post and the landing page—so you reasonably conclude that your call-to-action (CTA) must be the problem. This leads you to use a heatmap tool like Hotjar, and you notice that mouse movement would scroll right from the conclusion of the article to the comments section—right over your CTA. You swap it out and it draws the attention of a few more readers, which leads to a few more clicks, but still not the results you were hoping for.
Is Your HubSpot Portal Getting A Bit Dusty?
Wondering if you could be getting more value from your HubSpot investment? Find out with a free assessment from one of our experts.

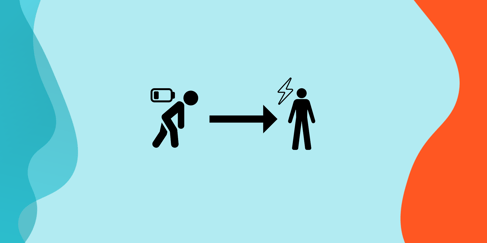
Then it hits you—maybe the problem wasn’t your CTA’s visual appeal. Maybe it wasn’t with your CTA at all. What if people just aren’t scrolling down far enough to see it? That would explain why nobody is clicking your beautifully designed, highly compelling call-to-action that leads to the best content offer you’ve ever produced!
Fortunately, Google Tag Manager has a few handy feature that makes answering this question incredibly easy.
Using Google Tag Manager with Google Analytics to Capture Call-To-Action (CTA) Impressions
Google Analytics’ events feature has long-been a fantastic solution for capturing clicks and interactions on your website. With Google Tag Manager, setup was quite easy.
If you wanted to measure the visibility of an element, however, you would be faced with a much more challenging task. That was, of course until Google announced the new feature in Google Tag Manager called the Element Visibility Trigger.
The Element Visibility trigger allows you track when an element is visible, or becomes visible, in the viewport. It also allows you to track changes in the DOM, such as when a form submission displays an inline thank you message, or a filter dynamically displays what content is displayed on the screen.
If “viewport” sounds like a foreign language to you, it essentially describes all content that is visible on your screen.

The addition of this feature is great because it provides marketers with a powerful way to determine if your blog’s readers are scrolling down far enough to actually see your calls-to-action, or if they are abandoning the page before the CTA ever enters the screen.
We use HubSpot to create our CTAs, so the steps below will use it as an example, but you can swap out your classes or ID’s to replicate this with any platform.
Step 1: Configure The Element Visibility Trigger
In your instance of Google Tag Manager, navigate to the Triggers section, and click NEW.
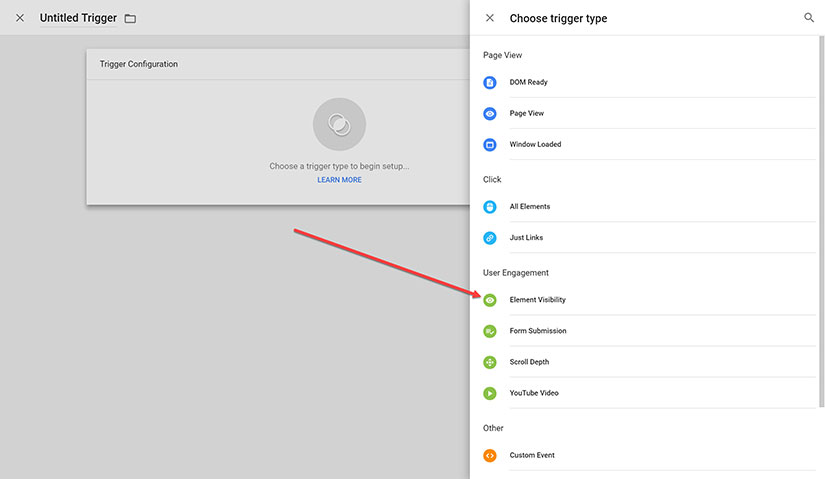
From the menu on the right, select Element Visibility, which will bring you to a screen that looks like this:
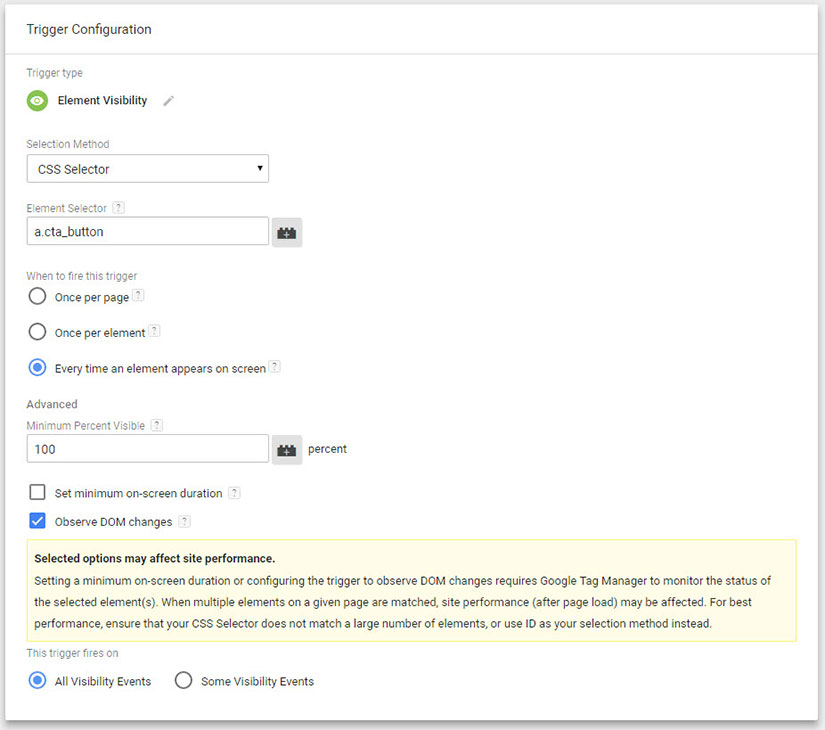
The first thing you will need to do is select your selection method. You have two choices:
- ID: Allows you to specify the ID attribute of the element that should fire this trigger. This is ideal if there is a common part of your template that you want to capture.
- CSS Selector: This is better if you want to track a very specific element, like a button or photo. This is what I chose to use.
I was able to capture HubSpot CTA’s by using the css selector: a.cta_button. This should work well if you’re also hoping to capture HubSpot CTA impressions, but for other use cases you’ll want to use your browser’s inspection tool to find the exact CSS selector that you need.
You’ll then need to specify how often you want this trigger to fire. I chose to fire the trigger “every time an element appears on screen” to account for a user scrolling up and down on a blog post, as we learned many users tend to do.
You can also specify how much of the element should be visible in order to be counted. I opted for 100%, but the tool will default to 50%. Other options include setting a minimum on-screen duration, and observing DOM changes.
We noticed that the trigger wasn’t working without “Observe DOM changes selected,” but I would test without it first, as having this selected may slow your page speed time.
Step 2: Configure The Google Analytics Event
Before I share the steps for capturing the impressions as events in Google Analytics, here is a quick primer on the feature.
Event tracking allows you to capture user interactions with content that can be tracked independently from a web page or a screen load. Events can also be used to track changes to the screen that may influence user behavior, such as the appearance of an element, which is what we are aiming to do here.
Events consist of the following values:
- Category – Typically the object that was interacted with (e.g. ‘Video’)
- Action – The type of interaction (e.g. ‘play’)
- Label – Useful for categorizing events (e.g. ‘Fall Campaign’)
- Value – A numeric value associated with the event (e.g. 42)
- Non-Interaction Hit (Optional) – Prevents the hit from being treated as an interaction
To create the event with Google Tag Manager, navigate to Tags -> New Tag. Click the Tag Configuration box to select the tag type, and choose to create a Universal Analytics tag.
We chose the following naming convention:
- Category – CTAs
- Action – Impression
- Label – URL – Scroll Percentage% (more on this later in the article)
- Value – 0
- Non-Interaction Hit – True
This should look something like this:
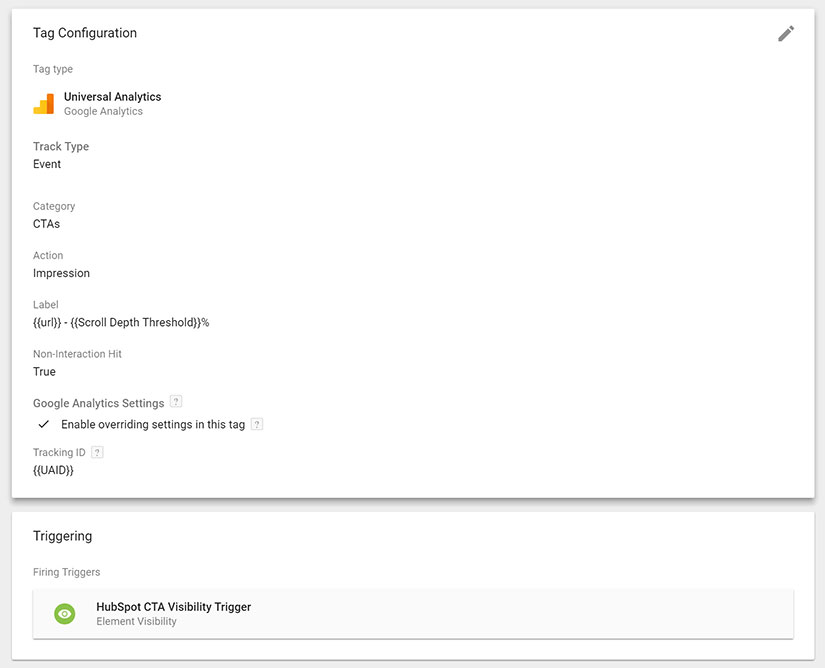
As you can see in the screenshot above, the tag is fired whenever the Element Visibility Trigger is fired.
Bonus: Configure Scroll Tracking to Provide More Context
In reviewing your newly created events, you may notice that some CTAs aren’t getting as many impressions as you had expected. This could be because your readers aren’t scrolling down far enough on the page to see them.
We can validate this using the new Scroll Depth Trigger in Google Tag Manager.
The configuration steps are quite similar to the process for capturing element visibility. Simply create the new trigger, and then the event tag that will send the information to Google Analytics. Your setup may look something like this:
![]()
You can take things one step further to capture clicks on your CTAs, allowing you calculate the number of visitors who first see, and then click.
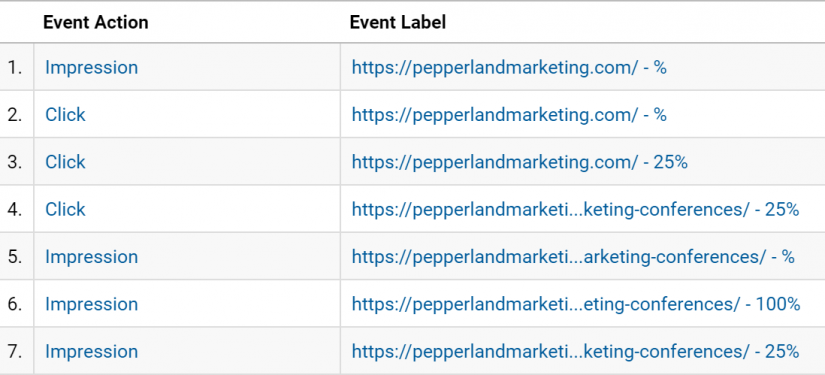
You can see this come together in your Events report, or in the Real Time Events report as seen below:
Using the Data to Take Action
With all this great new data you can begin to answer the following questions:
- Which of my calls-to-action are getting a lot of impressions but few click-throughs?
- Which articles fail to get users to scroll to the bottom of the page?
- Does moving my CTA higher up in the article increase click-throughs?
- Do our mobile users see our CTAs less often than desktop users?
By capturing this data and answering questions like these you can identify actions that could skyrocket your click-through rates and conversions—just one more powerful way that good data can accelerate growth.